In recent years, closure wigs have become one of the most sought-after protective styling options for anyone looking to experiment with new hair textures, lengths, and colors without committing to permanent chemical processes or risking damage to natural tresses. Whether you’re a beginner seeking an effortless install or a seasoned wig enthusiast wanting a quick yet convincing look, a closure wig offers a perfect balance of affordability, versatility, and natural appearance. This article delves into every aspect of closure wigs—from their construction and unique benefits to practical tips for wearing, styling, and maintaining them—so you can make an informed choice and get the most out of your investment.
What Is a Closure Wig?
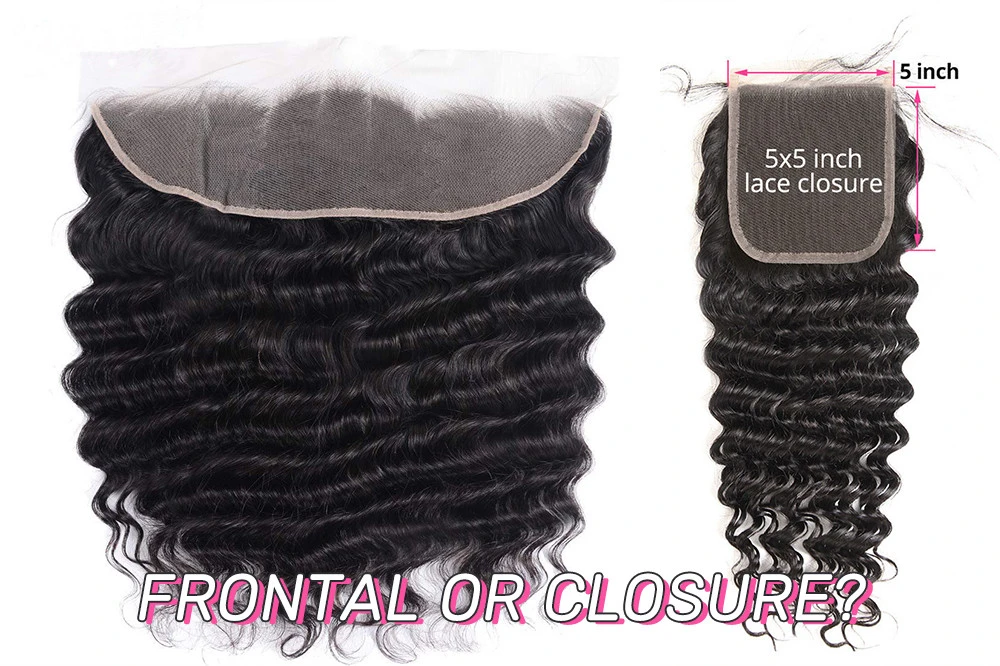
A closure wig is characterized by a small, typically square-shaped piece of lace—commonly measuring 4×4 inches or 5×5 inches—into which individual hair strands are hand-tied. This lace “patch” is strategically placed on the crown or front of the wig cap, stretching roughly from temple to temple. Unlike lace frontals, which span ear to ear and allow for versatile parting across the entire hairline, closures offer a more concentrated area of realism at the hairline. The hand-tied knots create the illusion of hair growing directly from the scalp, delivering an undetectable hairline that elevates the wig’s authenticity.
Construction and Materials
Lace Base
Closures are most often crafted from one of three thin lace types—French, transparent, or HD lace. Each offers:Breathability: Thin lace allows air circulation, preventing heat buildup.
Seamlessness: Blends seamlessly with various skin tones when properly secured.
Comfort: Lightweight feel, reducing pressure on the scalp.
Hair Quality
Premium closure wigs utilize 100% virgin human hair, meaning the cuticles remain intact and aligned in the same direction. This ensures:Durability: Can withstand regular heat styling, coloring, or bleaching.
Natural Movement: Mimics the flow and shine of real hair.
Longevity: With proper care, high-grade human hair closures can last over a year.
Cap Construction
The remainder of the wig cap may feature machine-wefted tracks or hand-tied motifs, depending on the style and price point. This combination ensures fullness and structure while keeping costs down.
Benefits of Choosing a Closure Wig
Affordability
Because the handmade lace area is smaller, closure wigs typically cost less than full lace or lace frontal counterparts. This makes them an ideal entry point for those exploring wigs without a substantial financial commitment.Natural Hairline
The hand-tied lace section provides a flawless, undetectable hairline. When adhered with industry-standard glues or tape, the closure melts into the skin, giving the appearance of natural hair growth.Hair Protection
Closure wigs act as a shield between your natural hair and potential damage from heat styling or environmental stressors. You can dye, straighten, or curl your wig to suit any occasion without compromising the health of your own strands.Ease of Installation
Beginners often find closures more manageable than frontals. The smaller lace area reduces the steps and products needed for a secure, long-lasting hold.Longevity and Maintenance
With fewer glue applications and minimal customization required, closures are less prone to lifting or damage over time, making them particularly suitable for warmer climates or those with active lifestyles.
Closure Wig vs. Frontal Wig: Making the Right Choice
| Feature | Closure Wig | Frontal Wig |
|---|---|---|
| Lace Coverage | 4×4” or 5×5” square at crown/front | 13×4” or 13×6” spanning ear to ear |
| Parting Options | Limited to one or two preset parts | Fully customizable across the hairline |
| Cost | More budget-friendly | Higher due to larger lace area |
| Hairline Realism | Highly natural within the closure | Seamless realism across entire front |
| Installation Ease | Beginner-friendly | Requires more skill and product |
If you crave limitless styling possibilities—side parts, zig-zag sections, or pulled-back ponytails—a frontal wig may be worth the investment. Conversely, closures excel for those prioritizing simplicity, cost-effectiveness, and a natural-looking, central part.
How to Wear and Secure a Closure Wig
Prepare Your Natural Hair
Braid or slick your hair down, ensuring a flat surface. Use a wig cap to hold everything in place and create a barrier between your hair and adhesive.Cleanse the Hairline
Gently wipe the skin along your hairline with isopropyl alcohol or a tack remover wipe. This removes oils and residue for optimal adhesion.Apply Adhesive
Glue Method: Brush a thin layer of wig adhesive along your hairline and allow it to become tacky (about 30–45 seconds).
Tape Method: Position wig tape under the closure’s lace edge.
Position the Wig
Align the closure with your natural hairline, pressing gently to secure. Use a cool blast from a blow dryer to set the adhesive.Style and Blend
Trim any excess lace carefully with small scissors. Lay baby hairs or edge control gel to enhance the illusion of a seamless hairline.
Styling Tips for Closure Wigs
Part Location: Most closures come with a preset middle or side part. Use a tail comb to accentuate this part and deepen it with a bit of concealer that matches your scalp tone.
Heat Styling: Always apply a heat protectant before using flat irons or curling wands. Virgin human hair closures can tolerate up to 400°F, but excessive heat will shorten their lifespan.
Updos and Ponytails: Because closures cover only the crown, high ponytails may reveal wig tracks. Opt for half-up styles or low buns to maintain coverage.
Maintenance and Care
Washing: Gently cleanse with sulfate-free shampoo and lukewarm water. Avoid scrubbing the lace area; pat dry with a microfiber towel.
Conditioning: Apply a moisturizing conditioner from mid-shaft to ends. Rinse thoroughly to prevent product buildup on the lace.
Detangling: Use a wide-tooth comb, starting at the tips and working upward to the roots.
Storage: When not in use, store your wig on a mannequin or satin stand to maintain shape and prevent tangling.
Refresh: Every 4–6 weeks, remove any old adhesive from the closure and scalp. Reapply fresh glue or tape for a renewed bond.
Common Mistakes to Avoid
Skipping Preparation: Failing to clean your scalp or lay your natural hair flat can result in poor adhesion and an uneven hairline.
Using Excessive Glue: A thick layer of adhesive not only looks unnatural but also takes longer to dry and can damage the lace.
Overusing Heat: Frequent high-temperature styling can dry out and weaken human hair fibers, leading to split ends and frizz.
Neglecting Edges: Cutting closure lace too close or unevenly can compromise its integrity and make visible cuts.
Conclusion
Closure wigs strike the perfect compromise between realism, affordability, and ease of use. They enable you to achieve a natural, head-turning hairstyle with minimal time and financial investment. By understanding their construction, benefits, and proper care techniques, you can enjoy a seamless look that protects your natural hair and boosts your styling versatility. Whether you’re a first-time wig wearer or a protective styling veteran, a closure wig offers an accessible path to gorgeous, damage-free hair transformations.


Validate your login